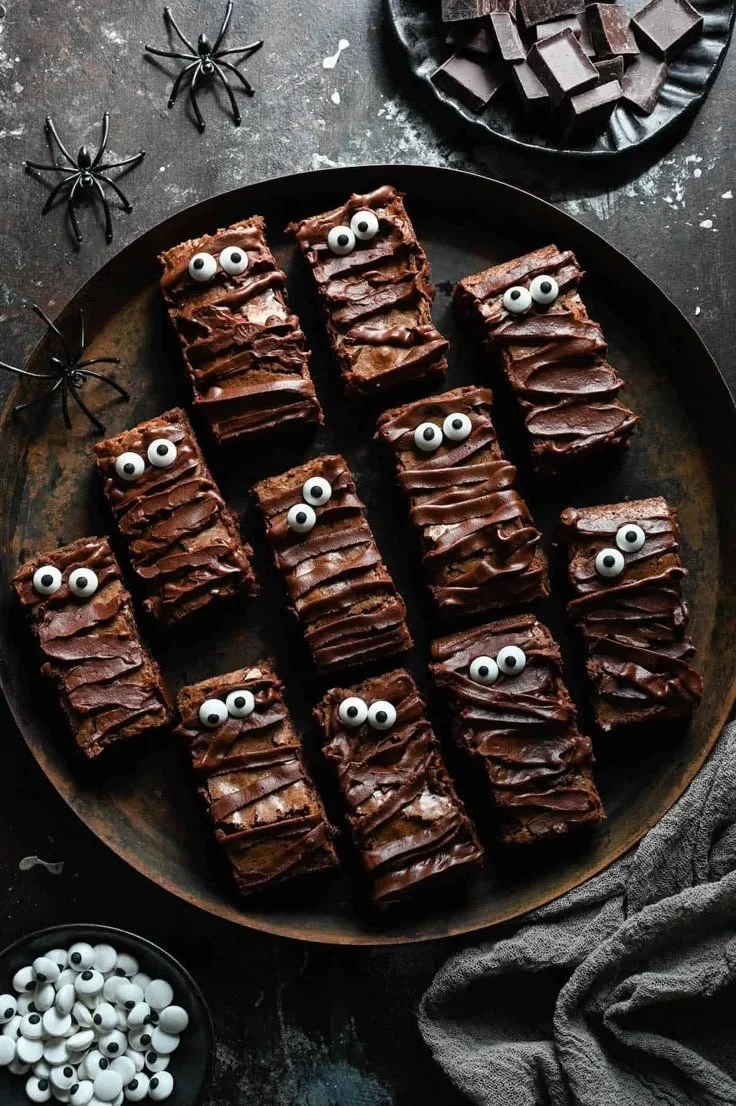
Halloween Mummy Brownies are a deliciously spooky treat that brings a fun twist to your Halloween festivities. These moist and fudgy brownies are topped with creamy white chocolate, creating a perfect canvas for playful mummy designs. They’re simple enough for beginner bakers and are sure to be a hit at any Halloween gathering, making them worth your time in the kitchen!
Why You’ll Love Halloween Mummy Brownies
- Easy to Make: With straightforward steps, even novice bakers can create these delightful brownies.
- Fun Presentation: The mummy design brings an element of creativity, perfect for Halloween celebrations.
- Deliciously Rich: The combination of fudgy brownies and sweet white chocolate creates a satisfying treat that everyone will love.
- Customizable: You can tweak the recipe with different toppings or colors to fit your Halloween theme.
- Perfect for Sharing: These brownies are great for parties, school events, or simply to enjoy with family and friends.
Recipe Overview
- Prep Time: 15 minutes
- Cook Time: 25 minutes
- Total Time: 40 minutes
- Servings: 12 brownies
- Difficulty Level: Easy
Ingredients You’ll Need for Halloween Mummy Brownies
-
For the Brownies:
- 1 cup (2 sticks) unsalted butter
- 2 cups granulated sugar
- 4 large eggs
- 2 teaspoons vanilla extract
- 1 cup all-purpose flour
- 1 cup unsweetened cocoa powder
- 1 teaspoon baking powder
- 1/2 teaspoon salt
-
For the Topping:
- 1 1/2 cups white chocolate chips (for melting)
- Candy eyes (for decorating)
(Always add 
here)
How to Make Halloween Mummy Brownies
-
Preheat Your Oven: Set the oven to 350°F (175°C). Grease a 9×13-inch baking dish or line it with parchment paper.
-
Melt the Butter: In a medium saucepan, melt the butter over low heat. Once melted, remove it from heat and stir in the sugar until well combined.
-
Mix in Eggs and Vanilla: Let the mixture cool for a few minutes, then add the eggs one at a time, mixing well after each addition. Stir in the vanilla extract.
-
Combine Dry Ingredients: In a separate bowl, whisk together the flour, cocoa powder, baking powder, and salt.
-
Combine Wet and Dry Mixtures: Gradually add the dry mixture to the wet mixture, stirring until just combined. Do not overmix; a few lumps are okay.
-
Bake the Brownies: Pour the brownie batter into the prepared baking dish, spreading it evenly. Bake for 25 minutes, or until a toothpick inserted in the center comes out with a few moist crumbs.
-
Cool and Prepare Topping: Allow the brownies to cool in the pan for at least 10 minutes. Meanwhile, melt the white chocolate chips in a microwave-safe bowl in 30-second intervals, stirring after each until completely melted.
-
Decorate for Mummies: Once the brownies have cooled, spread a layer of melted white chocolate on top. Use a piping bag or a plastic bag with a corner snipped off to drape lines of white chocolate across the brownies to resemble mummy wrappings. Finish by placing candy eyes on top.
Tips for Success
- Check Doneness: Start checking the brownies a few minutes before the timer goes off to avoid overbaking. The edges should be set, but the center may still look slightly undercooked.
- Cooling Time: Allow the brownies to cool completely before adding the topping for a smooth finish.
- Piping: If you don’t have a piping bag, a zip-top plastic bag can work as a substitute. Just snip off a small corner for fine control.
- Storing Topping: If using leftover melted chocolate, let it harden in the refrigerator and use it for other treats or snacks.
Easy Variations
- Chocolate Ganache: Replace the melted white chocolate with chocolate ganache for a richer flavor.
- Add Sprinkles: Use festive Halloween sprinkles atop the white chocolate for extra fun and color.
- Nutty Brownies: Stir in 1 cup of chopped nuts like walnuts or pecans into the brownie batter for added crunch.
- Mint Chocolate Mummies: Use peppermint baking chips instead of white chocolate for a minty twist.
What to Serve with Halloween Mummy Brownies
- Halloween-Themed Snacks: Pair with ghost-shaped cookies for a delightful dessert platter.
- Ice Cream: A scoop of vanilla ice cream complements the rich chocolate flavor.
- Pumpkin Treats: Serve alongside pumpkin-flavored goodies like pumpkin pie or pumpkin bread to enhance the fall theme.
- Hot Chocolate: A warm cup of hot chocolate makes for a perfect pairing on chilly Halloween nights.
Storage and Reheating
- Refrigerator Storage: Store brownies in an airtight container in the refrigerator for up to one week. This helps keep them moist.
- Freezer Storage: For longer storage, wrap individual brownies with plastic wrap and freeze them for up to 3 months.
- Reheating: To enjoy a warm brownie, microwave for about 10-15 seconds straight from the refrigerator or thawed from the freezer.
- Texture Preservation: To maintain tenderness, let brownies come to room temperature before freezing and store them in an airtight container.
Common Mistakes to Avoid
- Overbaking: Keep an eye on your brownies toward the end of the baking time; they can quickly turn from fudgy to dry.
- Skipping Ingredients: Make sure to measure ingredients accurately; skipping eggs or too much flour can affect the texture.
- Adding Topping Too Soon: Wait until the brownies are completely cool before adding the white chocolate to prevent melting.
Halloween Mummy Brownies: Background & Cultural Inspiration
Halloween Mummy Brownies combine the playful spirit of Halloween with a beloved dessert. The tradition of dressing food in spooky themes dates back centuries, reflecting the social significance of food in festivities. The use of mummies as a motif stems from the popularity of Egyptian mythology in Halloween lore, inviting creativity and fun in preparation. This recipe draws inspiration from classic brownies that are popular year-round, reimagining them into a seasonal treat that engages young and adult bakers alike.
Frequently Asked Questions
Can I make these brownies ahead of time?
Yes, you can prepare these brownies a day or two in advance. Store them in an airtight container to maintain freshness.
What can I substitute for white chocolate?
You can use vanilla-flavored frosting or melted almond bark if you prefer not to use white chocolate.
How do I prevent my brownies from getting dry?
Be sure to monitor your brownies closely while baking. They are done when the edges are set but the center is still slightly moist.
Can I freeze leftover brownies?
Absolutely! Wrap them tightly in plastic wrap and store them in an airtight container if freezing.
Can I use gluten-free flour?
Yes, you can substitute all-purpose flour with a gluten-free flour blend, but the texture may vary slightly.
Final Thoughts
Halloween Mummy Brownies are a delightful treat that combines taste and creativity, making them perfect for any Halloween gathering. They’re easy to prepare, offer great flavor, and serve as a fantastic dessert to impress your guests. Give this recipe a try and enjoy the smiles they bring, making your Halloween even more special!
PrintHalloween Mummy Brownies
These moist and fudgy brownies topped with creamy white chocolate create a playful mummy design, perfect for Halloween celebrations.
- Prep Time: 15 minutes
- Cook Time: 25 minutes
- Total Time: 40 minutes
- Yield: 12 brownies
- Category: Dessert
- Method: Baking
- Cuisine: American
- Diet: Vegetarian
Ingredients
- 1 cup (2 sticks) unsalted butter
- 2 cups granulated sugar
- 4 large eggs
- 2 teaspoons vanilla extract
- 1 cup all-purpose flour
- 1 cup unsweetened cocoa powder
- 1 teaspoon baking powder
- 1/2 teaspoon salt
- 1 1/2 cups white chocolate chips (for melting)
- Candy eyes (for decorating)
Instructions
- Preheat your oven to 350°F (175°C). Grease a 9×13-inch baking dish or line it with parchment paper.
- Melt the butter in a medium saucepan over low heat. Stir in the sugar until well combined.
- Mix in the eggs one at a time, mixing well after each addition. Stir in the vanilla extract.
- Combine the flour, cocoa powder, baking powder, and salt in a separate bowl.
- Add the dry mixture to the wet mixture, stirring until just combined.
- Bake the brownie batter in the prepared baking dish for 25 minutes, or until a toothpick comes out with a few moist crumbs.
- Cool the brownies in the pan for at least 10 minutes. Meanwhile, melt the white chocolate chips in the microwave in 30-second intervals, stirring until smooth.
- Decorate the cooled brownies with a layer of melted white chocolate and drizzle more to create mummy wrappings. Add candy eyes on top.
Notes
Allow the brownies to cool completely before adding the topping for a smooth finish.